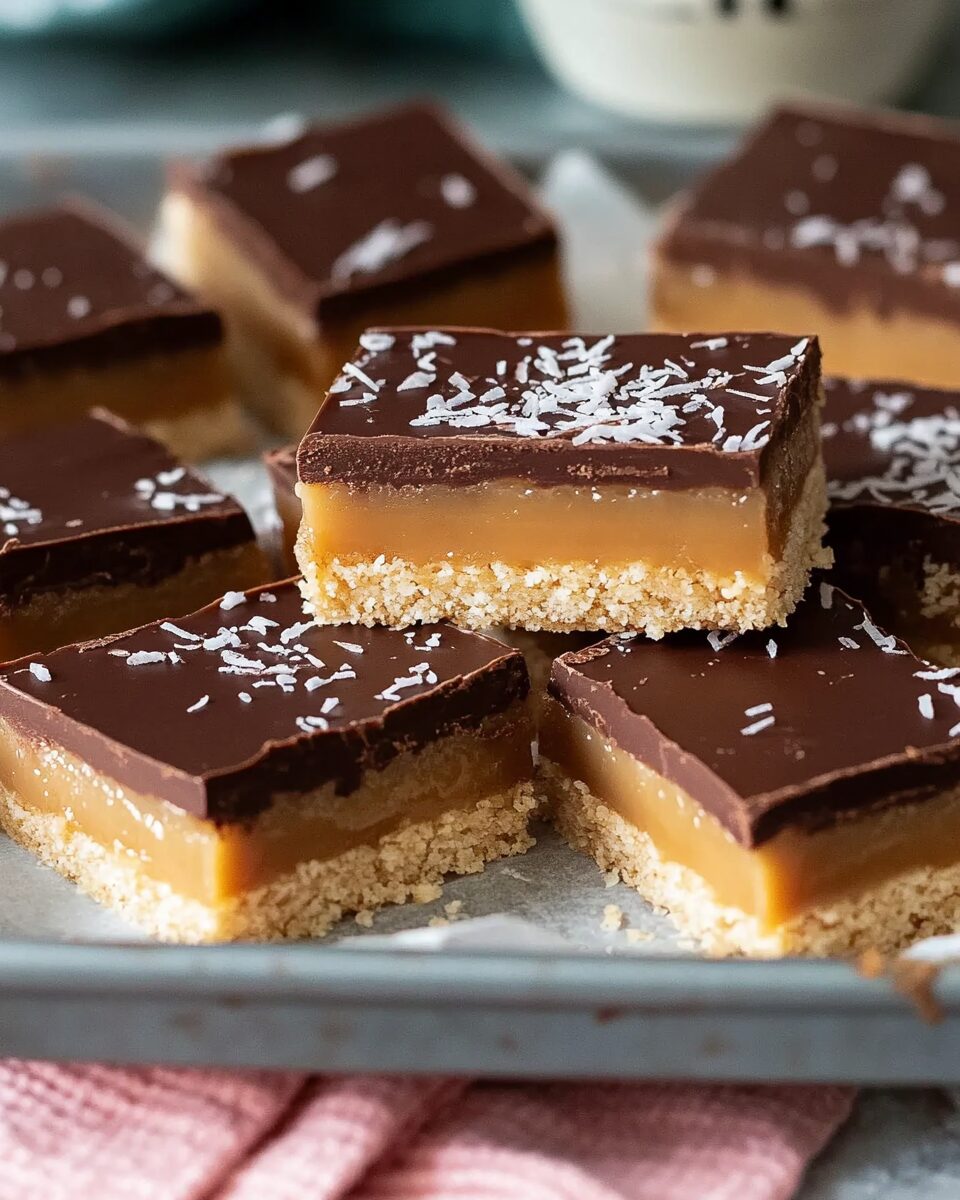
The caramel slice is a beloved classic in Australian baking culture, known for its iconic three-layer structure: a golden coconut base, a rich, velvety caramel center, and a silky layer of chocolate on top. This version is foolproof—thanks to a method that guarantees a perfectly set caramel and a smooth chocolate finish that doesn’t crack under pressure.
Ideal for celebrations, lunchbox treats, or simply indulging your sweet tooth, this slice combines nostalgic comfort with a polished bakery finish. You don’t need a candy thermometer or fancy skills—just some pantry basics and a craving for caramel perfection. Every bite is a balance of texture and flavor that’s bound to become your new go-to recipe for sharing (or not).
Full Recipe:
Base:
-
1 cup plain/all-purpose flour
-
1/2 cup brown sugar, loosely packed
-
1/2 cup desiccated coconut (or sweetened finely shredded coconut for US)
-
125g / 4.5 oz unsalted butter, melted
Caramel Filling:
-
125g / 4.5 oz unsalted butter, chopped
-
1/2 cup (80g) brown sugar, loosely packed
-
1 tsp vanilla extract
-
395g / 14 oz sweetened condensed milk (1 can)
Chocolate Topping:
-
200g / 7 oz dark or milk melting chocolate (or semi-sweet chocolate chips)
-
1 tbsp vegetable oil
Directions:
-
Preheat oven to 180°C/350°F (160°C fan). Line a 7″x11″ pan with parchment paper, leaving an overhang for easy removal.
-
Combine all base ingredients in a bowl and mix well. Press mixture into the prepared pan and bake for 15 minutes until golden. Let it cool.
-
Lower oven temperature to 160°C/320°F (140°C fan). For the caramel, melt butter, brown sugar, and vanilla in a saucepan over medium-low heat. Once the butter melts, whisk to combine and bring to a simmer.
-
Add condensed milk and whisk constantly for 5 minutes until thick and bubbling. Whisk for an additional minute, then pour evenly over the base.
-
Bake for 12 minutes, then cool on the counter for 20 minutes and refrigerate for 30 more.
-
For the topping, microwave chocolate and oil in 30-second bursts, stirring in between, until fully melted. Spread over the caramel layer and shake pan to smooth. Refrigerate for 1 hour to set.
-
Before cutting, remove from fridge and let it sit for 5 minutes. Use a warm knife to cut clean slices.
Prep Time: 20 minutes | Cooking Time: 40 minutes | Total Time: 1 hour
Kcal: 470 kcal per serving | Servings: 16
The Irresistible Appeal of Caramel Slice
Caramel Slice is one of those nostalgic, universally beloved treats that never fails to evoke memories of childhood lunchboxes, café displays, and bakery windows. With its three indulgent layers—golden coconut biscuit base, rich caramel center, and glossy chocolate topping—it’s easy to see why it’s remained a staple dessert for decades, particularly in Australia and New Zealand. But its reputation has spread far beyond the Southern Hemisphere, gaining international recognition under names like Millionaire’s Shortbread or Chocolate Caramel Bars.
What makes this slice so enduring is not only its delicious flavor but the satisfying contrast in textures. The base provides a sturdy, slightly crunchy foundation; the caramel brings a luxurious creaminess; and the chocolate topping adds just the right snap—when done properly. It’s a treat that looks as good as it tastes, slices beautifully, and keeps well, making it ideal for both casual snacking and festive entertaining.
A Classic with Global Roots
While Australians and New Zealanders claim the Caramel Slice as a national classic, it shares similarities with shortbread-based desserts popular in the UK and North America. The concept of layering a buttery base with a sweet middle and chocolate topping is timeless. However, the Aussie version tends to have a distinctive coconut-flavored biscuit crust that adds extra depth and texture.
Interestingly, in the UK it’s more commonly called “Millionaire’s Shortbread,” a nod to its richness and indulgence. In the U.S., you’ll hear “chocolate caramel bars” or “twix bars” in reference to the famous candy bar. No matter the name, its appeal remains universal—decadent, comforting, and wonderfully indulgent.
Why This Recipe Stands Out
Many Caramel Slice recipes out there promise perfection, but few deliver. Common issues include runny caramel, chocolate that cracks when cut, or overly sweet fillings that overwhelm the palate. This particular recipe overcomes all those problems through simple, smart techniques and the use of key ingredients like full-fat sweetened condensed milk and a small amount of vegetable oil in the chocolate topping.
One of the standout features of this recipe is its reliability. The caramel layer sets properly without needing a candy thermometer, and the chocolate remains smooth and crack-free when sliced. These small but critical details make it an ideal go-to recipe whether you’re baking for a crowd or treating yourself.
Perfecting the Layers
A good Caramel Slice relies heavily on the success of each individual layer. The base needs to be just sweet enough to complement the caramel without being cloying. The addition of desiccated coconut gives the base a subtle chew and nutty flavor, offering a great contrast to the soft middle layer.
The caramel layer is where the magic happens. Using sweetened condensed milk along with butter and brown sugar creates a rich, smooth filling that sets beautifully once baked and cooled. Unlike traditional caramel, which can be temperamental and time-consuming, this simplified version is foolproof for home bakers.
The final chocolate layer is not just decorative—it completes the bite. Melting the chocolate with a touch of oil ensures it remains slightly soft, making it easier to cut without fracturing. This step also gives the top a glossy, professional finish, enhancing visual appeal.
Tips for the Best Results
Even though this recipe is beginner-friendly, a few tips can help elevate your Caramel Slice to café-quality.
Cool the base before adding caramel:
Letting the biscuit layer cool slightly before adding the caramel prevents the layers from blending and creates a clean visual distinction.
Whisk the caramel constantly:
Keeping the caramel moving while it simmers avoids burning and helps achieve an even consistency. Watch for slow, large bubbles to know it’s ready.
Use quality chocolate:
Choose a good-quality dark or milk chocolate that melts smoothly and complements the sweetness of the caramel. Semi-sweet chocolate chips work well for balance.
Let layers cool gradually:
Don’t rush the cooling process. Letting the slice cool at room temperature before refrigeration helps prevent condensation, which can affect the texture of the chocolate.
Slice with a warm knife:
To get those picture-perfect bars, run your knife under warm water, wipe it dry, and make clean, decisive cuts. This helps avoid chocolate cracks and smearing.
Common Mistakes and How to Avoid Them
Runny caramel:
This usually happens when using skim condensed milk or skipping the baking step after adding the caramel. Always use full-fat condensed milk and bake the caramel to help it set fully.
Cracked chocolate top:
If you’ve ever tried cutting into a chilled Caramel Slice only to watch the chocolate shatter, you’re not alone. Adding a tablespoon of vegetable oil to the melted chocolate and letting the slice sit out for a few minutes before cutting can prevent this.
Oozing layers:
If the caramel layer starts seeping out or is too soft, it’s likely undercooked or not cooled properly. Ensure the caramel thickens enough on the stovetop and gets adequate refrigeration before cutting.
Overly sweet:
Using dark chocolate instead of milk can help balance the sweetness of the caramel. Also, keeping the base mildly sweet allows the richness of the other layers to shine without becoming overwhelming.
Creative Variations
Once you’ve mastered the basic recipe, there are several ways to customize your Caramel Slice to fit different tastes or dietary needs.
Salted Caramel Slice:
Add a sprinkle of sea salt to the caramel before baking to cut through the sweetness and add a gourmet touch.
Nutty Delight:
Incorporate crushed almonds or pecans into the base or as a topping for added crunch.
Gluten-Free Option:
Substitute the plain flour with a gluten-free baking blend. Make sure to use certified gluten-free ingredients throughout.
Vegan Twist:
Use plant-based condensed milk and vegan butter, and replace the chocolate with dairy-free alternatives. Note that the texture might differ slightly but can still be delicious.
Espresso Infusion:
Add a teaspoon of instant coffee to the caramel for a mocha-like flavor that pairs beautifully with dark chocolate.
Advertisement
Storing and Serving Suggestions
Caramel Slice stores well and even improves in flavor and texture a day after baking. Keep it in an airtight container in the refrigerator if the weather is warm or on the counter if it’s cool. It can last up to 5 days, although it’s rarely left uneaten for that long.
For serving, consider cutting the slice into small squares or narrow bars, especially if you’re serving them at a gathering. The rich flavor makes a little go a long way, and the neat presentation will make them look irresistible on any dessert table.
You can also freeze Caramel Slice. Just layer the pieces between sheets of parchment paper and store in a freezer-safe container for up to 3 months. Thaw at room temperature before serving.
Conclusion
The Caramel Slice is a timeless, crowd-pleasing dessert that embodies everything we love about home baking—comfort, indulgence, and simplicity. Its blend of textures and rich flavors makes it a standout among slice recipes, and with a few easy tricks, it can be elevated to professional levels right from your own kitchen.
Whether you’re making it for a bake sale, a weekend treat, or a family gathering, this recipe delivers dependable results every time. Best of all, it offers just enough room for creativity and personalization to make it your own. From its crunchy base to its silky caramel center and smooth chocolate top, the Caramel Slice is more than just a dessert—it’s a sweet reminder that the best things in life often come in layers.