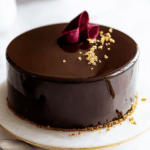
This glossy chocolate mirror glaze is an absolute showstopper! Its smooth, reflective surface adds an elegant touch to any dessert, especially cakes. The rich, dark chocolate flavor pairs perfectly with the sweetness of your cake or pastry, creating a balanced and indulgent treat.
Whether you’re making a celebration cake, a simple chocolate mousse, or any dessert that needs a stunning finishing touch, this mirror glaze is sure to impress. Its luxurious sheen not only looks gorgeous but also provides a silky texture that elevates your entire dessert experience. It’s a versatile and professional technique you’ll want to master for all your baking endeavors!
Full Recipe:
-
200g dark chocolate
-
100g heavy cream
-
50g water
-
75g sugar
-
1 tablespoon corn syrup
-
1 teaspoon vanilla extract
-
2 teaspoons gelatin powder
-
4 tablespoons water (for gelatin)
Directions:
-
Start by blooming the gelatin. In a small bowl, combine the gelatin powder with 4 tablespoons of water and let it sit for 5-10 minutes.
-
In a medium saucepan, combine the heavy cream, sugar, and water. Heat over medium heat, stirring occasionally, until it just begins to simmer and the sugar dissolves.
-
Remove from heat and add the dark chocolate, stirring until fully melted and smooth.
-
Stir in the bloomed gelatin and corn syrup, continuing to stir until everything is fully incorporated.
-
Allow the glaze mixture to cool slightly before adding vanilla extract and stirring well.
-
Pour the glaze through a fine-mesh sieve to remove any unwanted bits, ensuring a silky smooth texture.
-
Let the glaze cool to about 95°F (35°C) before pouring it over your cake, ensuring a beautiful, shiny finish.
Prep Time: 15 minutes | Cooking Time: 10 minutes | Total Time: 25 minutes
Kcal: 80 kcal per serving | Servings: 10-12 servings
Introduction to Chocolate Mirror Glaze
The chocolate mirror glaze is a professional-level decoration technique that creates a stunning, shiny finish on cakes and other desserts. The smooth, reflective surface gives your cakes a glossy and luxurious appearance, making them look as though they belong in a high-end bakery. The glaze is perfect for a variety of desserts, from simple cakes to intricate layered creations. Whether you’re a seasoned baker or just starting out, learning how to perfect this glaze will elevate your baking to the next level.
In this article, we will dive into the details of creating a flawless chocolate mirror glaze, tips to ensure its success, and some variations you can experiment with. This glaze technique is highly versatile and can be customized to suit different flavors and styles of desserts. By the end of this guide, you’ll be able to create mirror-glazed cakes that are both visually striking and delicious.
What is Chocolate Mirror Glaze?
A chocolate mirror glaze is a silky-smooth, reflective glaze made from chocolate, heavy cream, sugar, and gelatin. The primary appeal of this glaze is its glossy, mirror-like finish, which adds a sleek and polished touch to any cake. It’s typically used on mousse cakes, tarts, and other baked goods where a rich, dark chocolate glaze is desired. The shine and texture of the glaze come from the combination of fat (in the cream and chocolate) and the gelatin that helps it set perfectly when poured over a cold cake.
While it may seem like a complicated technique, mastering the chocolate mirror glaze is quite achievable with the right ingredients and a bit of patience. Once you’ve perfected it, you can use it on any number of desserts for a professional-looking result that will impress your friends and family.
How Does Chocolate Mirror Glaze Work?
The mirror glaze works by creating a smooth, shiny finish that coats the entire surface of your cake. The glaze is poured over a chilled or frozen cake, allowing it to set into a glossy layer that hardens slightly on the outside but remains soft and creamy underneath. The key to achieving that perfect mirror-like finish is to ensure the glaze is poured at the correct temperature and consistency.
To make sure the glaze sets correctly, it’s important to follow the right steps. You need to work quickly once the glaze is made, as it will thicken and set as it cools. When poured at the correct temperature (usually around 95°F or 35°C), the glaze spreads evenly over the cake’s surface and forms that signature smooth, reflective finish.
Why Use a Chocolate Mirror Glaze?
There are several reasons why bakers love to use a chocolate mirror glaze on cakes:
-
Visual Appeal: The mirror glaze provides a stunning finish that makes cakes look professional and elegant. It’s perfect for special occasions like weddings, birthdays, or holiday celebrations.
-
Versatility: While chocolate is the most common choice for mirror glaze, it can be customized with different flavors, colors, and finishes. You can add flavors like coffee, caramel, or fruit to the glaze to complement your cake’s taste.
-
Smooth, Uniform Surface: One of the unique benefits of using a mirror glaze is its ability to create a perfectly smooth surface. This is particularly useful for cakes with intricate shapes or multiple layers that need to be beautifully unified in appearance.
-
Durability: Once the glaze has set, it forms a slightly firm shell that can be handled without worrying about it smudging. This makes mirror-glazed cakes easier to transport and present, as the glaze stays intact and looks pristine.
Common Mistakes to Avoid When Making Mirror Glaze
While making a chocolate mirror glaze isn’t overly complicated, there are a few common mistakes that can cause the glaze to fail. Here are some of the things to watch out for:
-
Incorrect Temperature: If the glaze is too hot or too cold when poured onto the cake, it can result in an uneven or dull finish. The ideal pouring temperature is around 95°F (35°C). If it’s too warm, it will run off the cake, and if it’s too cool, it will harden too quickly and won’t spread evenly.
-
Not Straining the Glaze: After melting the chocolate and combining the other ingredients, it’s essential to strain the glaze through a fine-mesh sieve to remove any bits or bubbles. This ensures a silky-smooth texture.
-
Not Using Gelatin Properly: Gelatin is a key ingredient in achieving the shiny finish. If it isn’t bloomed properly or the gelatin mixture isn’t fully incorporated, it could result in a glaze that doesn’t set correctly or is too thick to pour smoothly.
-
Pouring Over a Warm Cake: A cake that is still warm or hasn’t chilled properly will cause the glaze to melt or not set correctly. Make sure the cake is completely chilled or frozen before applying the glaze to get the best results.
How to Customize Your Chocolate Mirror Glaze
While the classic chocolate version is the most popular, there are endless ways to customize your mirror glaze to match your cake’s flavor profile or to add a unique twist. Here are some ideas for customizations:
-
Flavored Mirror Glaze: Add flavors like coffee, orange, or raspberry to the glaze for a delicious twist. Simply incorporate the flavor into the cream and sugar mixture before combining it with the chocolate.
-
Colored Mirror Glaze: You can add food coloring to create a vibrant, colorful finish on your cakes. Gel food colors work best as they don’t alter the texture or consistency of the glaze.
-
Marbled Effect: For a creative look, you can create a marbled mirror glaze by swirling two different colored glazes together before pouring them over the cake.
-
Glitter and Shine: Add edible glitter or luster dust to the glaze to give it a touch of sparkle. This can create a more festive look for special occasions like weddings or birthdays.
When to Use a Chocolate Mirror Glaze
Chocolate mirror glaze is ideal for various types of desserts, particularly those with mousse bases or intricate layers. Here are some examples of when you might want to use this beautiful glaze:
-
Mousse Cakes: Mirror glaze is often used on mousse cakes because the smooth, shiny layer complements the soft, creamy filling beneath it. The contrast between the firm glaze and delicate mousse is visually appealing.
-
Layered Cakes: If you’re making a multi-layered cake, the mirror glaze can unify the layers and create a sleek, professional look.
-
Tarts and Pastries: Mirror glaze can be applied to tarts or pastries for a polished finish. The reflective surface enhances the overall visual appeal and makes your dessert look elegant.
-
Special Occasions: Whether it’s a wedding cake, a birthday cake, or a holiday dessert, a mirror glaze adds sophistication and beauty to any celebration.
Conclusion
Mastering the chocolate mirror glaze can transform your baking, turning any dessert into a showpiece. By following the right steps and avoiding common mistakes, you can create a perfect glossy finish every time. Whether you’re making a cake for a special occasion or simply want to impress with your baking skills, a mirror glaze will elevate your desserts to new heights. With some creativity, you can customize the glaze to fit any flavor or design, making it a versatile and impressive technique that is sure to wow your guests.


